Asset Mage W

Special Effects Tools

The main setup tool can be found in the Editor’s top menu: ‘Tools → UNI VFX → Special Effects Tools’.

Integrate tab

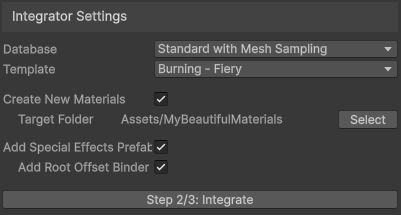
Easily apply Special Effects to new objects using predefined templates. Select the game object to which you want to add Special Effects, and follow the three-step setup process.

The first step is to check the selected Game Object and its contents. If a Game Object contains multiple renderers, you can exclude the renderers you don't want to use, but more importantly, you can select which renderer will be the primary one. The primary renderer is the one to which VFX will be applied. To select the primary renderer, drag it to the top of the list. Typically, you should pick the largest (skinned) mesh.

If you want to use more VFX per character or don’t want to use VFX at all, you can configure this later in the Special Effects script.

Integrator Settings let you choose whether you want to use Standard VFX or Cheap VFX variant which uses simple box to spawn particles instead of mesh sampling.

You can choose to Create new materials which will attempt to copy supported material properties from existing materials on selected renderers. This works reliably on URP lit shader but only a subset of inputs is supported (albedo, smoothness, normal, occlusion, emission, transparency and metallic or specular). For other shaders, the result depends on whether the material properties are named the same as in the URP lit (which makes HDRP lit also mostly supported out of the box). If not, you’ll need to set the base properties manually in the material(s).

The shader can work with transparent materials but for the Dissolve to work, the final material must always use alpha clipping. You may tweak AlphaClipThreshold property in the material to better match the original look.
If you only want to create new materials, you can uncheck the Add Special Effects Prefab checkbox. Otherwise the Prefab will be added as a direct child of the selected Game Object. It contains Special Effects script and Visual Effect component.
Last checkbox will add Root Offset binder when using Skinned Mesh which sends the position of the root bone to the VFX. This helps “center particles” (such as 6D explosions) to stay with the mesh while also improving the accuracy of the Dissolve VFX when using Object Axis on Skinned Meshes.

In the next step (if you add the prefab) you are taken to the second tab.